
Four cute long legged festive crochet baubles for you to make in time for Christmas. Let me know how you get on, and try out different looks for your snowman. I fancy making one with a black top hat, or maybe a multicoloured scarf.
They make a wonderful gift and you can whip all 4 of them up using just a few 50g balls of yarn.
Materials
Double knit wool in light brown, brown, red, white, black and orange
3mm crochet hook
yarn needle
6mm poly ball
stuffing
Gauge – the bauble body should fit snugly around the 6cm foam ball. If your bauble body is too small, try using a larger crochet hook. If your work is too big, use a smaller hook.
Abbreviations
This pattern is written in UK crochet terms.
sl st – slip stitch
st – stitch
dc – double crochet
inc – increase (dc 2 stitches into 1)
dec – decrease (miss a stitch, then dc into the next stitch)
(x) – the number of stitches you will have at the end of the row
rnd – round
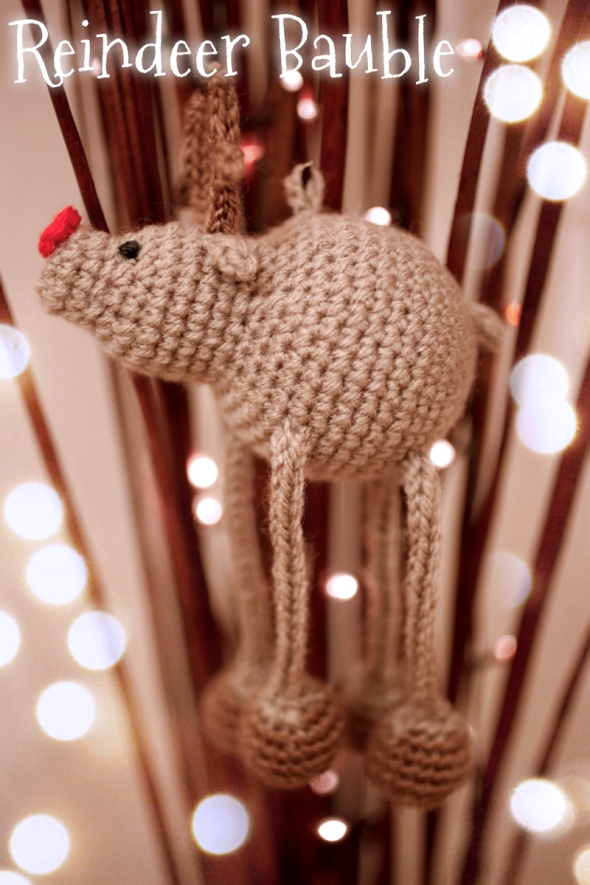
Reindeer bauble
Body
Starting at reindeer’s bottom,,
In light brown, magic circle 6
or
chain 6, sl st into 1st st to create a loop. dc 6 st into centre of loop.
rnd 1 – *inc 1* 6 times (12)
rnd 2 – *inc 1, dc 1* 6 times (18)
rnd 3 – *inc 1, dc 2* 6 times (24)
rnd 4 – *inc 1, dc 3* 6 times (30)
rnd 5 – *inc 1, dc 4* 6 times (36)
rnd 6 to 14 – work even (continue to work without increasing or decreasing)
rnd 15 – *dec 1, dc 4* 6 times (30)
rnd 16 – *dec 1, dc 3* 6 times (24)
rnd 17 – *dec 1, dc 2* 6 times (18)
rnd 18 – *inc 1, dc 2* 6 times (24)
rnd 19 to 22 work even (24)
rnd 23 – *dec 1, dc 2* 6 times (18)
rnd 24 – *dec 1, dc 1* 6 times (12)
rnd 25 to 27 – work even
stuff the head and snout
rnd 28 – *dec 1*, 6 times (6)
Break thread and pull through to finish, use tail of thread to sew up the 6 st on tip of snout. Weave in ends.
This completes the basic shape.
Feet (make 4)
In dark brown, magic circle 6
or
chain 6, sl st into 1st st to create a loop. dc 6 st into centre of loop.
rnd 1 – *inc 1* 6 times (12)
rnd 2 – *inc 1, dc 1* 6 times (18)
rnd 3 to 5 – work even
rnd 6 – *dec 1, dc 1* 6 times (12)
stuff
rnd 7 – *dec 1*, 6 times (6)
Break thread and pull through to finish. Use thread tail to sew up last 6 st.
Legs (make 4)
In light brown, create an i-cord, 20 st high as follows:
Ch 3, push hook through 2nd st, catch yarn and pull through so you have 2 loops on hook. Push hook through 1st st of ch, catch yarn and pull through so you have 3 loops on hook.
*Slip the first 2 loops off your hook carefully. Hold them with your left hand so you don’t loose them. Hook yarn and pull through the loop on your hook.
Push hook through the st you took off your hook that is closest to the hook, catch yarn and pull through so you have 2 loops on your hook. Push hook through the remaining st that you had taken off your hook, catch yarn and pull through so you have 3 loops on your hook.*
Repeat the steps between the * 19 times. Catch yarn, pull through all 3 loops on your hook and break yarn to finish. Weave in ends.
Sew the feet onto the legs, then the legs to the body as in the photo.
Nose
In red, magic circle 6
or
chain 6, sl st into 1st st to create a loop. dc 6 st into centre of loop.
sew onto end of snout.
Ears (make 2)
In light brown, create a short, 4 row i-cord as before. Sew onto head
Antlers (make 2)
In dark brown, create one longer i-cord of 10 rows, and a shorter one of 4 rows. Sew the shorter one half way up the longer, and sew the antler to the head as in the photo.
Tail
In light brown, create a 4 row i-cord and sew to bottom.
For hanging loop, create a 8ch loop and sew to the top of the reindeer’s back.
Sew black dots for eyes to finish.
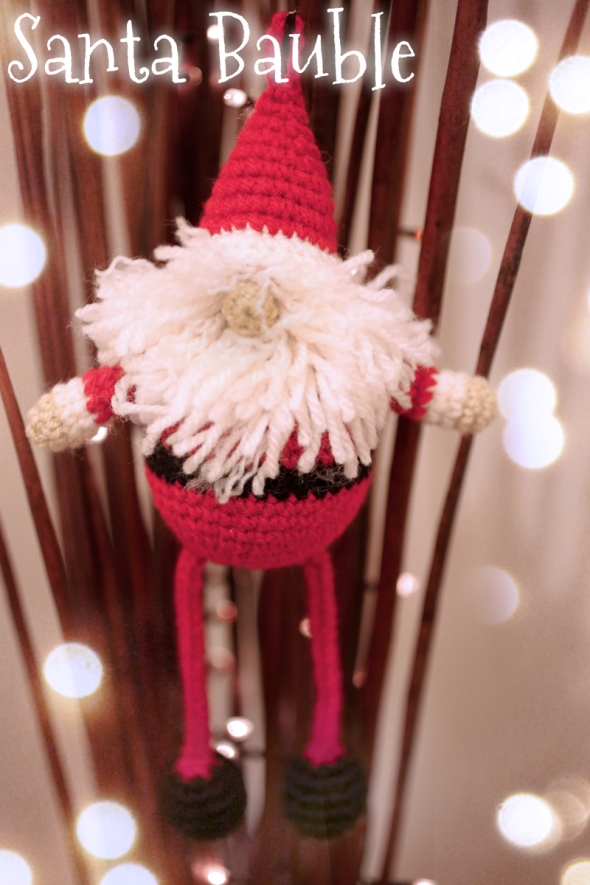
Santa Bauble
Body
Starting at the bottom of the body
In red, magic circle 6
or
chain 6, sl st into 1st st to create a loop. dc 6 st into centre of loop.
rnd 1 – *inc 1* 6 times (12)
rnd 2 – *inc 1, dc 1* 6 times (18)
rnd 3 – *inc 1, dc 2* 6 times (24)
rnd 4 – *inc 1, dc 3* 6 times (30)
rnd 5 – *inc 1, dc 4* 6 times (36)
rnd 6 to 8 – work even (continue to work without increasing or decreasing)
Change to black for next two rounds, then change back to red
rnd 11 to 14 – work even
rnd 15 – *dec 1, dc 4* 6 times (30)
rnd 16 – *dec 1, dc 3* 6 times (24)
rnd 17 – *dec 1, dc 2* 6 times (18)
change to skin tone
rnd 18 – *inc 1, dc 2* 6 times (24)
rnd 19 to 22 work even (24)
rnd 23 – *dec 1, dc 2* 6 times (18)
stuff head with fibre fill
rnd 24 – *dec 1, dc 1* 6 times (12)
rnd 25 – *dec 1*, 6 times (6)
Break thread and pull through to finish, use tail of thread to sew up the 6 st on top of head. Weave in ends.
This completes the basic shape.
Arms (make 2)
In skin tone, magic circle 6
or
chain 6, sl st into 1st st to create a loop. dc 6 st into centre of loop.
rnd 1 – *inc 1* 6 times (12)
rnd 2 – work even
change to white
rnd 3 and 4 – work even
change to red
rnd 5 to 9 – work even
Break thread and pull through to finish.
Stuff end of arm, leaving the top of the arm empty. Squeeze top of arm flat and sew shut. Sew arm to body using photo as reference. Weave in ends.
Feet (make 2)
In black, magic circle 6
or
chain 6, sl st into 1st st to create a loop. dc 6 st into centre of loop.
rnd 1 – *inc 1* 6 times (12)
rnd 2 – *inc 1, dc 1* 6 times (18)
rnd 3 to 5 – work even
rnd 6 – *dec 1, dc 1* 6 times (12)
stuff
rnd 7 – *dec 1*, 6 times (6)
Break thread and pull through to finish. Use thread tail to sew up last 6 st.
Legs (make 2)
In red, create an i-cord, 20 st high as follows:
ch 3, push hook through 2nd st, catch yarn and pull through so you have 2 loops on hook. Push hook through 1st st of ch, catch yarn and pull through so you have 3 loops on hook.
*Slip the first 2 loops off your hook carefully. Hold them with your left hand so you don’t loose them. Hook yarn and pull through the loop on your hook.
Push hook through the st you took off your hook that is closest to the hook, catch yarn and pull through so you have 2 loops on your hook. Push hook through the remaining st that you had taken off your hook, catch yarn and pull through so you have 3 loops on your hook.*
Repeat the steps between the * 19 times. Catch yarn, pull through all 3 loops on your hook and break yarn and pull through to finish. Weave in ends.
Sew the feet onto the legs, then the legs to the body as in the photo.
Hat
In white, ch 42, sl st into first st to create a large loop.
rnd 1 – work even
rnd 2 – *dec 1, dc 12* 3 times (39)
change to red
rnd 3 – *dec 1, dc 11* 3 times (36)
rnd 4 – *dec 1, dc 10* 3 times (33)
rnd 5 – *dec 1, dc 9* 3 times (30)
rnd 6 – *dec 1, dc 8* 3 times (27)
rnd 7 – *dec 1, dc 7* 3 times (24)
rnd 8 – *dec 1, dc 6* 3 times (21)
rnd 9 – *dec 1, dc 5* 3 times (18)
rnd 10 – *dec 1, dc 4* 3 times (15)
rnd 11 – *dec 1, dc 3* 3 times (12)
rnd 12 – *dec 1, * 6 times (6)
chain 8, sl st back into hat to create the loop you will use to hang your bauble. Break thread and pull through to finish, use tail of thread to sew up the 6 st on top of head. Weave in ends. Sew to top of head.
Nose
In skin tone, magic circle 6
or
chain 6, sl st into 1st st to create a loop. dc 6 st into centre of loop.
rnd 1 and 2 – work even
Break thread and pull through to finish. Use thread tail to sew up last 6 st. Weave in ends. Sew nose in centre of head as in photo.
Beard
Cut 6cm-8cm lengths of white yarn. Fold a piece in half, place hook under the surface of a st and catch the centre of the piece of white yarn. Pull through so you have a loop of white yarn on hook. Catch both ends of the white yarn and pull right through the loop on your hook. Tug and wiggle to tighten. Repeat this technique around the head for beard.
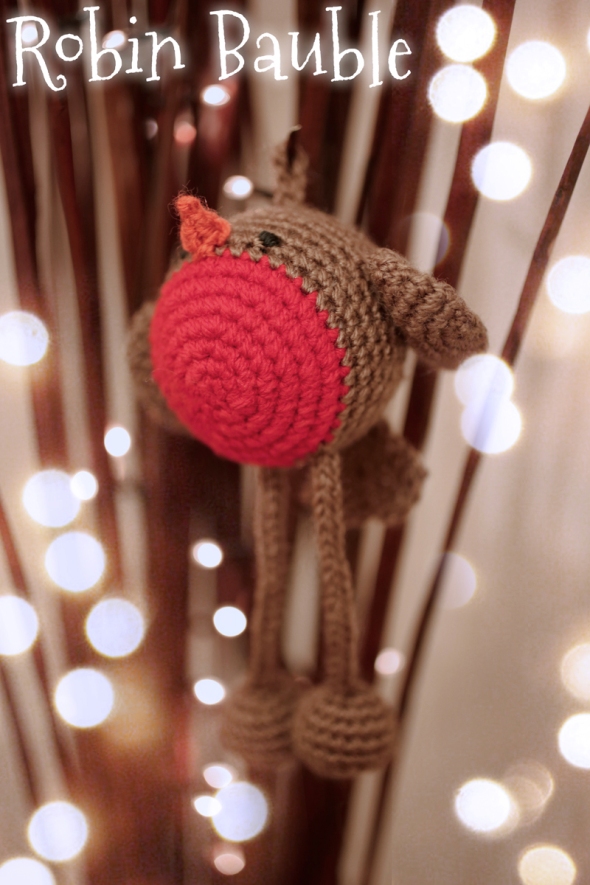
Robin Bauble
Body
Starting at centre of the robin’s red breast,
In red, magic circle 6
or
chain 6, sl st into 1st st to create a loop. dc 6 st into centre of loop.
rnd 1 – *inc 1* 6 times (12)
rnd 2 – *inc 1, dc 1* 6 times (18)
rnd 3 – *inc 1, dc 2* 6 times (24)
rnd 4 – *inc 1, dc 3* 6 times (30)
change to brown
rnd 5 – *inc 1, dc 4* 6 times (36)
rnd 6 to 14 – work even (continue to work without increasing or decreasing)
rnd 15 – *dec 1, dc 4* 6 times (30)
rnd 16 – *dec 1, dc 3* 6 times (24)
rnd 17 – *dec 1, dc 2* 6 times (18)
rnd 18 – *dec 1, dc 1* 6 times (12)
rnd 28 – *dec 1*, 6 times (6)
Break thread and pull through to finish, use tail of thread to sew up the 6 st on top of head. Weave in ends.
This completes the basic shape.
Feet (make 2)
In brown, magic circle 6
or
chain 6, sl st into 1st st to create a loop. dc 6 st into centre of loop.
rnd 1 – *inc 1* 6 times (12)
rnd 2 – *inc 1, dc 1* 6 times (18)
rnd 3 to 5 – work even
rnd 6 – *dec 1, dc 1* 6 times (12)
stuff
rnd 7 – *dec 1*, 6 times (6)
Break thread and pull through to finish. Use thread tail to sew up last 6 st.
Legs (make 2)
In brown, create an i-cord, 20 st high as follows:
Ch 3, push hook through 2nd st, catch yarn and pull through so you have 2 loops on hook. Push hook through 1st st of ch, catch yarn and pull through so you have 3 loops on hook.
*Slip the first 2 loops off your hook carefully. Hold them with your left hand so you don’t loose them. Hook yarn and pull through the loop on your hook.
Push hook through the st you took off your hook that is closest to the hook, catch yarn and pull through so you have 2 loops on your hook. Push hook through the remaining st that you had taken off your hook, catch yarn and pull through so you have 3 loops on your hook.*
Repeat the steps between the * 19 times. Catch yarn, pull through all 3 loops on your hook and break yarn to finish. Weave in ends.
Sew the feet onto the legs, then the legs to the body as in the photo.
Wings (make 2)
Starting at centre of the robin’s red breast,
In brown, magic circle 6
or
chain 6, sl st into 1st st to create a loop. dc 6 st into centre of loop.
rnd 1 – *inc 1* 6 times (12)
rnd 2 – *inc 1, dc 1* 6 times (18)
rnd 3 – *inc 1, dc 2* 6 times (24)
rnd 4 to 6 – work even
rnd 7 – *dec 1, dc 10*, 2 times (22)
rnd 8 – *dec 1, dc 9*, 2 times (20)
Break thread and pull through to finish. Flatten the wing, do not stuff. Sew the top of the wing to the body as in the photo, weave in ends.
Tail
ch 6, ch 1 and turn
*dc 3, tr 3, ch 1 and turn, tr 3, dc 3, ch 1 and turn* 2 times.
dc 6.
Break thread and pull through to finish. Sew thin end to body as in photo, weave in ends.
Beak
In orange, create a short, 3 row i-cord. Sew onto face. Weave in ends.
To create a hanging loop, ch 8, sl st to make a loop and sew onto top of robin.
Sew black dots for eyes to finish.
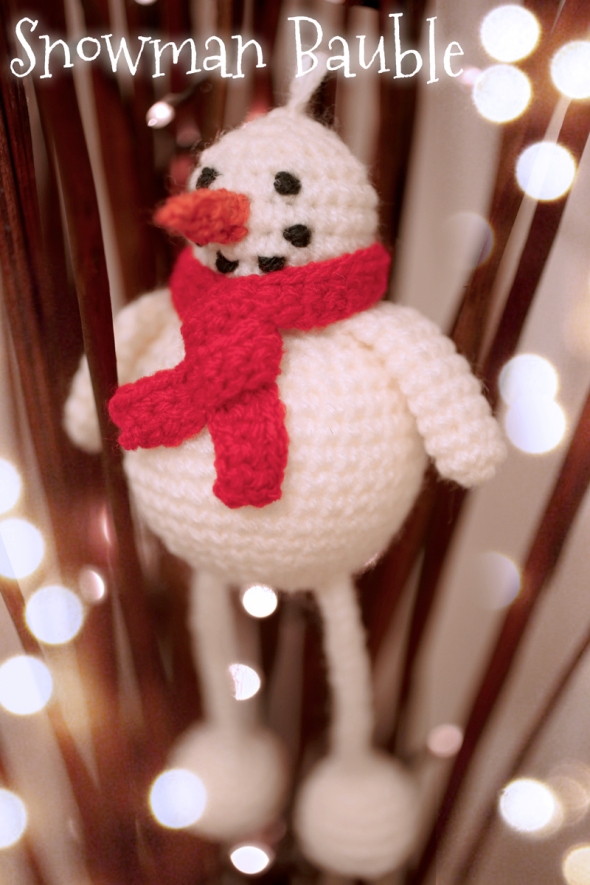
Snowman Bauble
Body
Starting at the bottom of the body
In white, magic circle 6
or
chain 6, sl st into 1st st to create a loop. dc 6 st into centre of loop.
rnd 1 – *inc 1* 6 times (12)
rnd 2 – *inc 1, dc 1* 6 times (18)
rnd 3 – *inc 1, dc 2* 6 times (24)
rnd 4 – *inc 1, dc 3* 6 times (30)
rnd 5 – *inc 1, dc 4* 6 times (36)
rnd 6 to 14 – work even (continue to work without increasing or decreasing)
rnd 15 – *dec 1, dc 4* 6 times (30)
rnd 16 – *dec 1, dc 3* 6 times (24)
rnd 17 – *dec 1, dc 2* 6 times (18)
rnd 18 – *inc 1, dc 2* 6 times (24)
rnd 19 to 22 work even (24)
rnd 23 – *dec 1, dc 2* 6 times (18)
stuff head with fibre fill
rnd 24 – *dec 1, dc 1* 6 times (12)
rnd 25 – *dec 1*, 6 times (6)
chain 8, sl st back into head to create the loop you will use to hang your bauble. Break thread and pull through to finish, use tail of thread to sew up the 6 st on top of head. Weave in ends.
This completes the basic shape.
Arms (make 2)
In white, magic circle 6
or
chain 6, sl st into 1st st to create a loop. dc 6 st into centre of loop.
rnd 1 – *inc 1* 6 times (12)
rnd 2 to 9 – work even
Break thread and pull through to finish.
Stuff end of arm, leaving the top of the arm empty. Squeeze top of arm flat and sew shut. Sew arm to body using photo as reference. Weave in ends.
Scalf
In Red, chain 50, ch 1 and turn
dc 50, ch 1 and turn
dc 50.
Break thread and pull through to finish. Sew into place on neck using photo as reference. Weave in ends.
Feet (make 2)
In white, magic circle 6
or
chain 6, sl st into 1st st to create a loop. dc 6 st into centre of loop.
rnd 1 – *inc 1* 6 times (12)
rnd 2 – *inc 1, dc 1* 6 times (18)
rnd 3 to 5 – work even
rnd 6 – *dec 1, dc 1* 6 times (12)
stuff
rnd 7 – *dec 1*, 6 times (6)
Break thread and pull through to finish. Use thread tail to sew up last 6 st.
Legs (make 2)
In White, create an i-cord, 20 st high as follows:
Ch 3, push hook through 2nd st, catch yarn and pull through so you have 2 loops on hook. Push hook through 1st st of ch, catch yarn and pull through so you have 3 loops on hook.
*Slip the first 2 loops off your hook carefully. Hold them with your left hand so you don’t loose them. Hook yarn and pull through the loop on your hook.
Push hook through the st you took off your hook that is closest to the hook, catch yarn and pull through so you have 2 loops on your hook. Push hook through the remaining st that you had taken off your hook, catch yarn and pull through so you have 3 loops on your hook.*
Repeat the steps between the * 19 times. Catch yarn, pull through all 3 loops on your hook and break yarn to finish. Weave in ends.
Sew the feet onto the legs, then the legs to the body as in the photo.
Nose
In Orange, create and i-cord 6 rows long. Sew this to the head. Weave in ends.
Sew black dots for eyes and mouth to finish.

These are just tooo cute!
Thanks so much
Soo very pretty!
Hope you enjoy making them!
I’m pretty sure I will. 🙂
They look great, thanks for the lovely pattern
You’re very welcome
These are fab, will add them to my list of Christmas makes, thanks for the pattern!
Send me a pic once you’ve made them!
Reblogged this on Gráficos e Receitas and commented:
Ideias de amigurumis para o Natal, e ele ensina a fazer as pernas alongadas dos bichinhos