
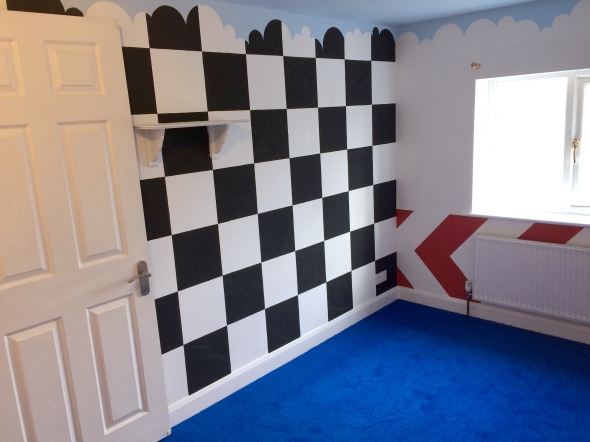
It has taken us 2 years, but we’ve finally decorated our son’s bedroom. Anybody who didn’t see the mural I painted in the last house, you can find it here. Whilst I was thrilled with the result, I vowed blind that I would never do anything like it again!
I must have forgotten.
Well, what actually happened was that I started with a nice, simple idea an I just got a little carried away. The boy ended up with a checkerboard wall, red chevrons chasing round the other three walls and a cloud boarder leading to a blue sky ceiling complete with aeroplanes.

Like I said, slightly carried away.
Note to self, a full room mural isn’t any better than a part wall one. And painting on the ceiling is really awkward, tiring and frustrating.
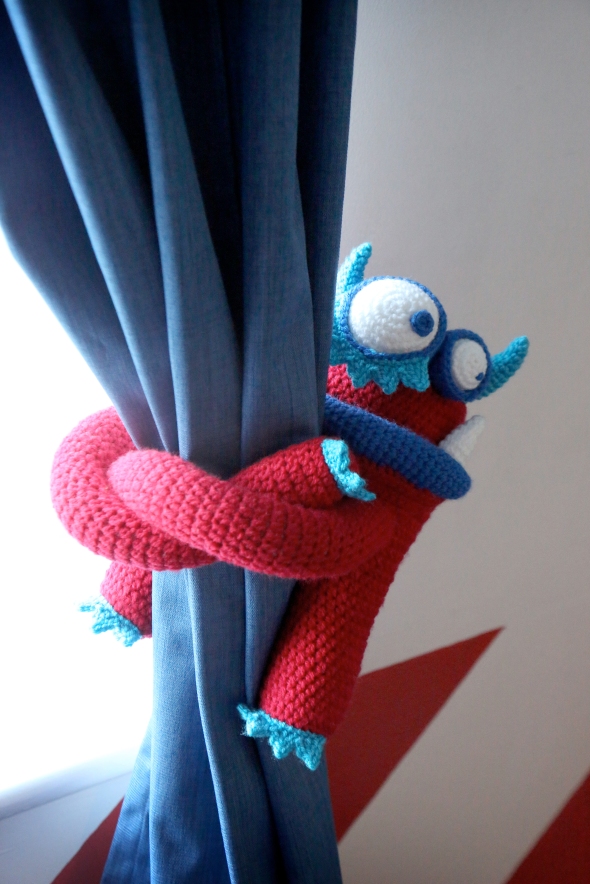
He got a brand spanking new carpet in royal blue, new lampshade and curtains. One thing I had forgotten to buy was curtain tiebacks. So I had some fun with the beautiful Women’s Institute yarn, which I absolutely adore, and made him some monster tiebacks.
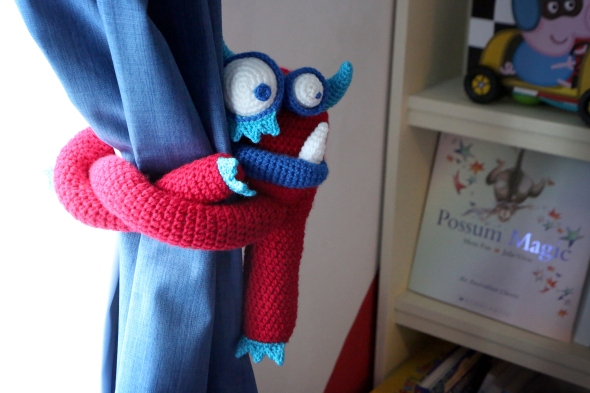
I wanted to share with you the pattern, so have included the basic monster body shape and some ideas for eyes, eyelashes, claws and horns. I suggest you play around with these, add more or less depending on what the recipient wants. I am dying to do one with loads of eyes, a tutu and bow!
Materials
Dk yarn in red (100gms) dark blue, light blue and white.
3mm hook
yarn needle
scissors
stuffing
Abbreviations
ch chain
dc double crochet
slst slip stitch
yoh yarn over hook
htr half treble
tr treble
rnd round
dec decrease

Pattern
Body in red
rnd1 Magic circle, 8htr into centre and pull to bring together. (8)
rnd2-7 working in htr, increase 8 evenly every round (56)
rnd8-22 continue to work even in htr (56)
to shape legs
htr24, then htr into 1st of these htr to create the first leg. Continue in htr, working even for 15 rnds. Dec2 until 6st remain and use end thread to sew up. This completes the 1st leg.
Back at open end of main body, miss 4 st then rejoin yarn, 1ch. Into same st, htr, and continue to htr until you have 24. Htr into 1st of these htr to create the second leg. Continue in htr, working even for 15 rnds. Dec2 until 6st remain and use end thread to sew up. This completes the 2nd leg.
Stuff body through hole between legs.
To cover hole, reattach yarn in st next to leg, 1ch, htr into same st, 3htr. 2htr into top of 1 leg, 4htr in sts at other side of base of body, 2 htr into final leg. (12) Dec2 until 6st remain and use end thread to sew up.
Arms (make 2) in red
magic circle, 8dc into centre, pull to tighten.
Increase 8 st evenly each rnd until you have 16. Work 40 rounds even. Stuff and sew to body using photo for reference. Not that one is places further forward than the other which helps your monster look over his shoulder rather than straight into the curtain.

Eyes in white
small
magic circle, 6dc into centre, pull to tighten.
Increase 6 st evenly each rnd until you have 18. Work 3 rounds even. Dec 6 evenly each round until you have 6 remaining (remember to stuff before hole gets too small), use end thread to sew up hole.
big
magic circle, 6dc into centre, pull to tighten.
Increase 6 st evenly each rnd until you have 30. Work 5 rounds even. Dec 6 evenly each round until you have 6 remaining (remember to stuff before hole gets too small), use end thread to sew up hole.
Eyelids in dark blue
big
magic circle, 6dc into centre, pull to tighten.
Increase 6 st evenly each rnd until you have 24. Work 4 rounds even.
Small
magic circle, 6dc into centre, pull to tighten.
Increase 6 st evenly each rnd until you have 36. Work 6 rounds even.
The eyes sit inside the eyelids.
Pupil in bark blue
Magic circle, 6dc into centre and pull tight. Slst into 1st dc to finish.
Lip in dark blue
magic circle, 4dc into centre, pull to tighten.
Increase 1 st each rnd until you have 12. Work 15 rounds even. Dec 1st every rnd until you have 4 left (remember to stuff before hole gets too small), use end thread to sew up hole.
Long tooth in white
magic circle, 4dc into centre, pull to tighten.
Increase 1 st each rnd until you have 9. Work 4 rounds even. Dec 1st every rnd until you have 4 left (remember to stuff before hole gets too small), use end thread to sew up hole.
Horn in light blue
magic circle, 4dc into centre, pull to tighten.
Increase 1 st each rnd until you have 12. Work 3 rounds even. Stuff and sew into place.
Claws and eyelashes.
These are made up of a line of crochet triangles.
ch a line of 3 times the number of triangles you want.
3ch, *yoh, hook into 4th ch from hook, yoh and pull through work (3 loops on hook) yoh and pull through 2 loops on hook (2 remain). Yoh, hook into next st, yoh and pull through work (4 loops on hook) yoh and pull through 2. Yoh pull through remaining 3.
2ch
slst into underside of 2nd ch from hook, 2slst down the side of the triangle, 1slst into the next ch st. **
2ch, then repeat from * to ** until last chain st on foundation row. Slst into it ad finish.

I suggest sewing the face on slightly to the side and over one shoulder so your monster isn’t facing into the curtain he is hugging, and sewing the arms on slightly to the side (see photo) to allow your monster to look more easily over his shoulder. How you sew on everything else is up to you, be creative and enjoy giving your monsters their own personalities!!
Once finished, you knot together the super long arms to tie the curtains back.
Lgl xx

It’s wonderful.
Thank you!
Lovely painting and tiebacks
Thank you so much, never again! …
What a fab idea! Far more exciting than the traditional sort!
Thank you! Unfortunately, until the novelty wears off, they are spending more time being hugged and played with than actually holding the curtains back!
Do you have the monster in a knitting pattern also.It is so good live it.
I have only created him in crochet, but if you’re a confident knitter, he’s made out of quite simple shapes so you could make one quite easily.
Alternatively, choose any toy design you like and just elongate the arms so that you can tie them round a curtain 😀
These are adorable. Would love to make one sometime!
Yeay!
Bedroom looks great and the monster tie-backs are awesome! Thanks for sharing the pattern. 🙂
You’re welcome and thank you x
Wow! Look at that room! Amazing.
Thank you x
I am making your wonderful monster for my grandson and jus noticed in the photos that there is s bit of a “chin” under his lip, but no instruction on how to make it. Any help you can give would be great. I am nearly ready to assemble him and his lip looks like it’s kind of floating on his face. 😃